If you are on the way to start a new blog and you bought the domain and hosting; you are now just left with WordPress installation and setup. I would recommend you to install and customize wordpress offline on your PC before making your site live.
Now the first question would be arising in your mind that why should you install WordPress on your PC on localhost? So this is the main reason for installing the WordPress offline on localhost.
Why should you install WordPress offline on localhost?
#1. Editing and checking result take less time
If you are editing or doing some initial WordPress setup and you want to cross check the result whether the change has occurred or not, then since you are editing and checking it online it may take time due to your internet speed. Page may take longer time to reload. And trust me it really a headache to work on slow internet speed when you want to reload the page again and again frequently.
#2. Best for editing theme
Whether you want to start your blog or else you have your one and want to change the theme then if you change your site theme while your site is live it may make annoy to several users due to sudden changes, since you have just activated another theme in which all your links on homepage, side widgets are to be setup. But using offline WordPress you can edit theme setting according to your requirement in your own pace of time without being in hurry.
#3. Can work offline without any internet connection
If you have installed WordPress on your localhost then you don’t need to wait for your internet connection for doing the setup. Even if your internet is down temporary you can edit the theme or work on dashboard offline without having internet connection.
I think above reasons are enough for your question. So, let have a look over the procedure to install WordPress offline on localhost.
Steps for installing WordPress offline on localhost:
#1. Create a local server on your PC
I know the heading of this step is somewhat techy but don’t worry even if you are non-tech guy you can do this within a couple of minutes.
Just download wamp or xampp and click on the downloaded setup file to install wamp or xampp on your PC.
Note: Install only one server out of the above two.
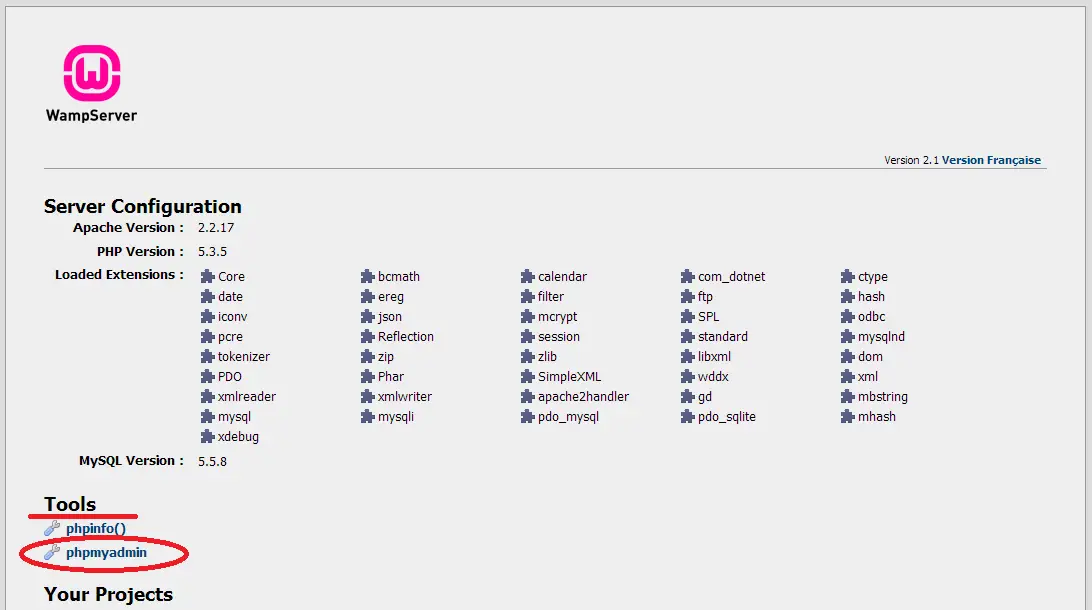
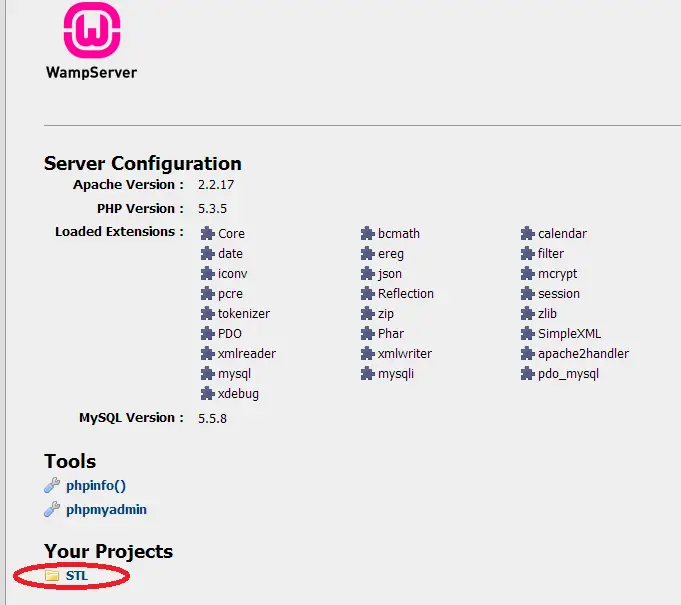
Once you have installed the wamp or xampp in your PC you can access the localhost from browser by typing ‘localhost’ or ‘127.0.0.1’ in address bar. And you can find the server’s files in ‘C:\wamp\www\’. If everything goes correct you can see this page in your browser as soon as you type’127.0.0.1’ in address bar.
Note: Since I have installed wamp server on my PC, here I am showing screenshots from Wamp servers
You can also check steps to install WordPress offline using XAMPP server.
#2. Create Database for you blog on localhost
Once you can see the above screen you can find ‘phpmyadmin’ option on this page under Tools heading, just click on this option to go to next step to create database.
Alternatively, you can type in browser’s address as ’localhost/phpmyadmin’ or ‘127.0.0.1/phpmyadmin’ to go to next step to create database. For login id and password, use root as login id and leave password textbox blank. Just hit Go!
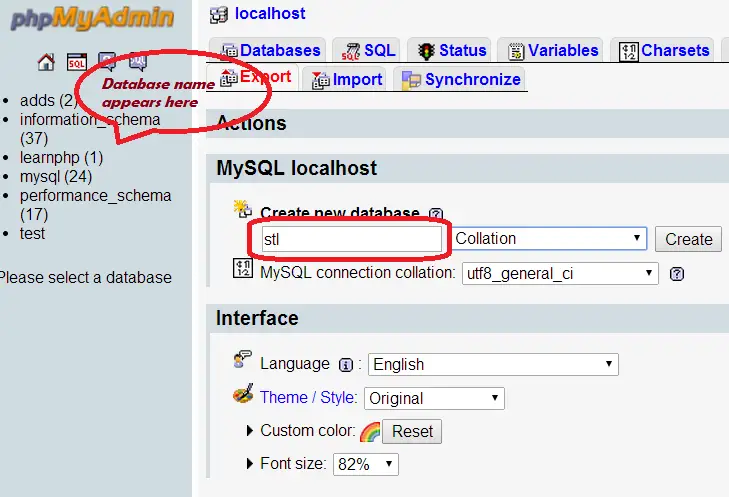
Once you have done with above steps you will be redirected to phpmyadmin page as shown below, just enter you database name let’s say ‘STL’ in textbox under ‘Create new database’ option and click on create button to create database. Once the database is created you can check your database name in left side column.
#3. Download and extract WordPress file
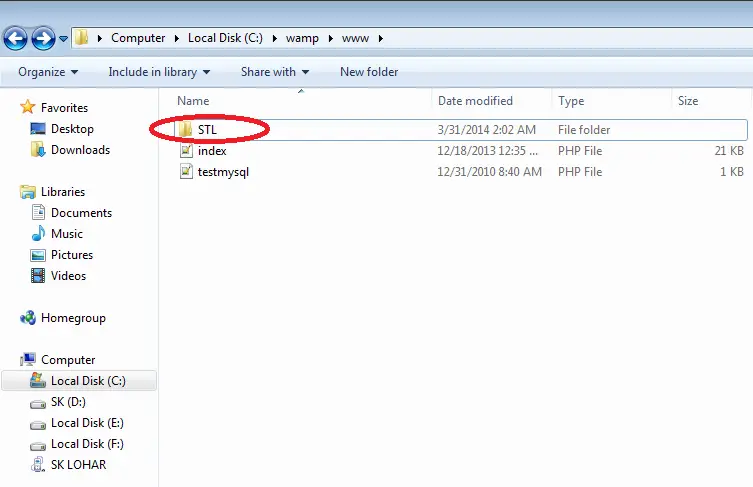
Download WordPress setup file from wordpress.org. Now make a folder in ‘C:\wamp\www\’ which will refer to yours site let’s say ‘STL’, extract the downloaded files in ‘C:\wamp\www\STL\’
#4. Edit wp-config-sample.php
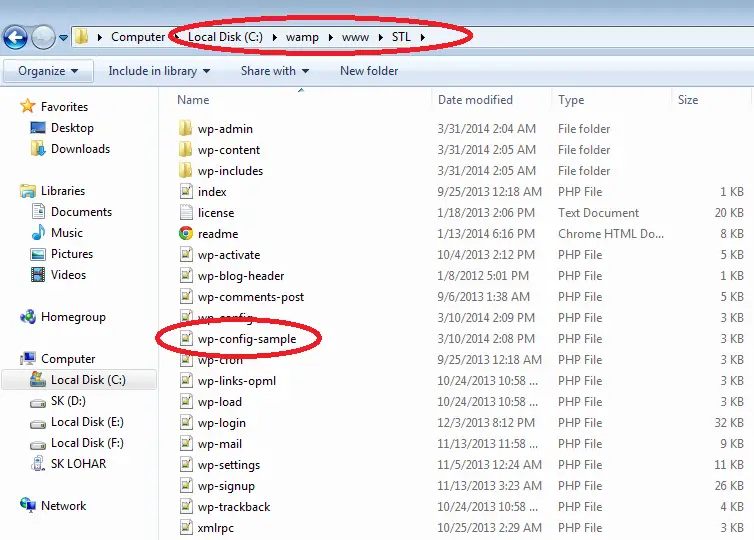
Now once you have extracted all files in your STL folder you will find a php file in STl folder named as ‘wp-config-sample.php’, just open this file and do the following changes as shown below:
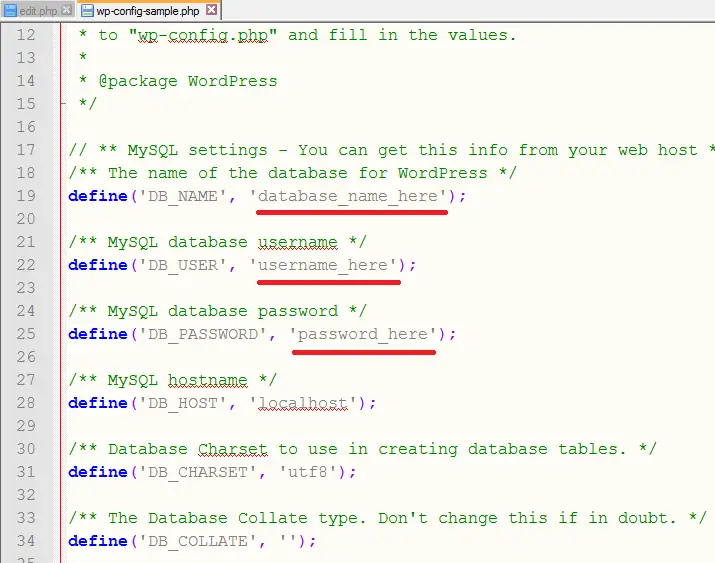
Replace the following:
#a. ‘database_name_here’ with ‘stl’ which you have made in setp #2.
#b. ‘username_here’ with ‘root’ since it is default username in localhost unless you have added another user.
#c. ‘password_here‘ with ‘ ’ (blank), here password should be empty, again same reason which is mention in #b.
Now Save As ‘wp-config-sample.php’ as ‘wp-config.php’ in ‘c://wamp/www/STL/’
#5. WordPress installation
After the above step just go to home page of your localhost again by typing ‘localhost’ or ‘127.0.0.1’ in address bar and now here you can see your STL folder as a porject which you have made in ‘c://wamp/www/’ under project option. Click on this project ‘STL’ to proceed with WordPress installation on localhost.
Alternatively, you can type ‘localhost/STL’ or ‘127.0.0.1/STL’ in browser’s address bar to proceed with WordPress installation on localhost.
Here you will be redirect to WordPress installation page as shown below where you need to provide the basic information about your blog like name, username, password, email, etc. Remember the username and password which you will be entering while installation will be same for WordPress dashboard login.
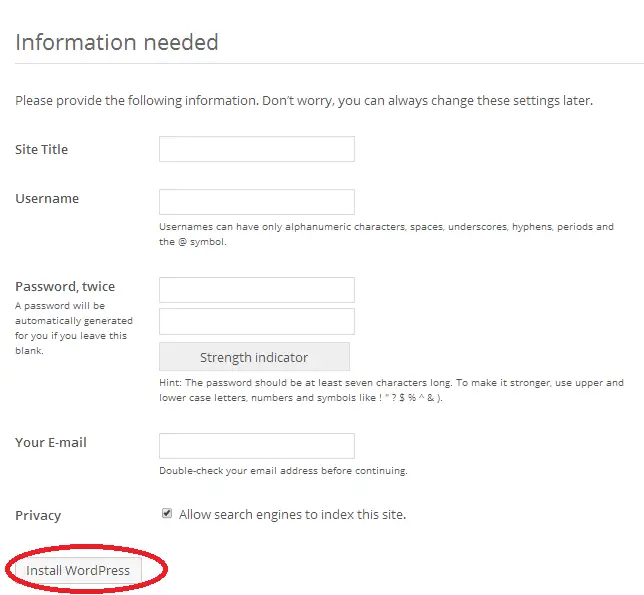
Once you are done with filling the information about your blog, click on ‘Install WordPress’ button to install the WordPress on your localhost in your PC. And now you are ready to login in your dashboard.
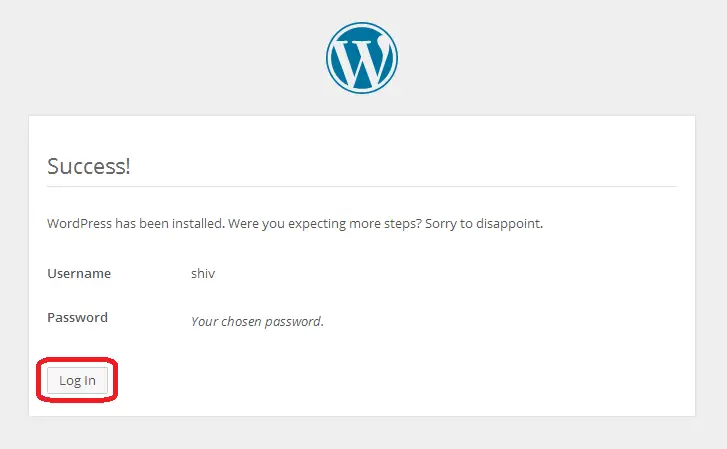
Click on login button to login to your blog dashboard which will be working offline without any internet connection. Now after login you can check every option and you will get access to everything on your dashboard as you have on online dashboard. Now edit everything as per your need and check as many times as you want before uploading the edited file in the root folder of hosting database.
Now if you want to access your blog using localhost, just follow the below steps:
#Launch wamp/xampp server in your PC using start in window 7
#Type ‘localhost/STL’ or ‘127.0.0.1/STL’ in browser’s address bar.
Please feel free to drop comment if you have any query about WordPress installation on local server. And share this with your friends if you find this a useful tutorial.


Hi Shivkumar,
Wow…now this looks like an awesome tool to use, especially when working off line. It is a bit “over my head” but as I carefully read through, I did get a good understanding of what this does.
I work from my home office, so I’m always plugged in. And when I need to get away, I unplug for my sanity. However, for those on the go, those who may have a job and still want to work on their own business… This is great!
I can see the many advantages this has! Thank you for introducing me to this and I will share it with my friends.
-Donna
donna merrill recently posted…Why Updating Your Blog Is Important
Hi Donna,
Glad to see you again & to know that you found this tool helpful.
It’s really easy to install and work on this local server,even for the newbie.
You can check your blog design or even any minor changes done in the blog on offline very quickly and efficiently before making it live for your dear readers.
Thanks for stopping by.
Shivkumar recently posted…How to install and customize WordPress offline on localhost?
Nice guide! I have done it before but always loved to read how to guides. I have done with both xampp and wamp but my favorite is xampp. Keep sharing such how tos.
Atish Ranjan recently posted…Essential things to do after setting up your wordpress blog
There is not much difference between these two server. Xampp is your favorite and mine is wamp. 😉 I will catch you bhai for the help if I decide to try for xampp in the future. 🙂
Glad to know that you like this guide and you love to read ‘how to’ guide. I will try my best to update more such guide.
Thanks for stopping by bhai..
Shivkumar recently posted…How to install and customize WordPress offline on localhost?
This is indeed a good guide for those who want to customize their wordpress blog. Its good to customize offline first rather doing direct on live blog. Thanks Shiv.
Hi Sarah,
Yes, offline customization is better option than customizing online.
Thanks and you are welcome on STL! 🙂
Shivkumar recently posted…How to install and customize WordPress offline on localhost?
Hi Shivkumar,
Great,i did not know that we can work so well offline on wordpress.This looks very useful tool…It happens sometimes that we do not have internet connection and by this tool we can use our time well…
Karnal Singh recently posted…Staff Nurse Vacancy LPSC Thiruvananthapuram April 2014
Hi Karnal,
Welcome on my blog.
I am glad to know that my post have add to your knowledge.
Yes, this is really a very useful tool for customizing blog theme, editing in WordPress file or even working on php based project.
Thanks for your comment. Keep visiting for such more tools. 🙂
Shivkumar recently posted…How to Uncover short link URL safety before you click using URL Uncover?
Hey Shiv bro,
Very informative post as Donna mentioned she was getting points perfectly but later she managed the same.
I truly think it is awesome tool for the one for the offline customaization. May you come up with more ideas like that as I am mediocre in all these stuff and hope your information keep me updated.
Thanks for sharing easy to understand instruction.
shiwangi shrivastava recently posted…Freelance Writing: Much Ado about Nothing
Hi Shiwangi Di,
I am very happy to see you on my blog, welcome to my blog. 🙂
It my pleasure to know that my ‘how to’ guide has updated your knowledge with this useful tools.
As you and everyone here knows that “learning never Ends”, I will keep learning and updating such more useful stuffs which will definitely add up to your knowledge.
Thank for stopping by Di, hope to see you again. Have a nice weekend 🙂
Shivkumar recently posted…How to Uncover short link URL safety before you click using URL Uncover?
Hi
Glad to see you with Word press.
I have been doing work on WordPress on local host since long time.
can you prefer me which local Server may i use XAMP Or WAMP???
TIM recently posted…MT-43 Manual High Pressure Pump
Hello Tim,
Welcome on blog.
As you have mention that you have been working on wordpress on localhost since long time. So which local server you were using till now?
As per you question, you can use any one of the two local sever at which you are comfortable.
For me wamp server is under my finger tip. So I would always prefer to work which wamp.
Thanks for stopping by, have a nice day ahead.
Shivkumar recently posted…How to Uncover short link URL safety before you click using URL Uncover?
Really detailed tutorial and I guess those who are first user of wamp, they could easily install and configure the wamp server.
Thanks
Samir recently posted…Download Free Instructions for IRS 1099 Tax Form
Hello Samir,
Wamp server is really easy too install and easy to access. I have tried my best to make the above tutorials easier and self explanatory.
Thanks for stopping by and commenting. 🙂
Shivkumar recently posted…Use HTTrack website copier and download entire website to access it offline.
Hi, Nice post buddy. I work from my home office, so I’m always plugged in. And when I need to get away, I unplug for my sanity. However, for those on the go, those who may have a job and still want to work on their own business… This is great! I find your site is well maintain. 🙂
Thank bhavesh for your kind words! 🙂
Shivkumar recently posted…Use HTTrack website copier and download entire website to access it offline.
Your always welcome Shiv.:)
Hi,
Good to see this post. I am come here by searching “offline local host customize WordPress plugin” via Google. You are addressing the good and worthy information by step by step tutorial. Generally people are prefer to write a lenghy post but I like your way to explain it with help of Image. So audience are easily understand. Thanks
Regards!!
Bhavesh
Hi Bhavesh,
Thanks for your kind words. 🙂
I am trying my best to deliver the important tools with easy self explanatory article.
Thanks for stopping by. 🙂
Shivkumar recently posted…3 most useful Microsoft office applications in Google Chrome Apps
Your very welcome Shiv. As I said this is really good. I personally believe that before you going to live your site you have to make all changes in offline mode instead of live. Because it’s a bit of difficult to work with a live site. 🙂
Hi Bhavesh,
Yes you are right. It become quite difficult to work on online mode due to various factor like network, bandwidth, speed of the net you are using, etc.
So working on offline must be a smart decision for anyone.
Thank for stopping by, have a great day! 🙂
Shivkumar recently posted…3 most useful Microsoft office applications in Google Chrome Apps
hi friend, nice post. i’d appreciate your effort in writing this awesome post. i have a question: can this tutorial work on android?
Hello Emmanuel,
Welcome to STL,
Thanks for appreciating my work.
Actually this offline concept require to make a local server which has to deal with different ports address which we won’t get in Android Tablet or smartphone. So this is not available for android.
Thanks for coming by and asking your doubt.
Have a great day bro! 🙂
>SK Lohar
Shivkumar recently posted…Earn free recharge for Smartphone using LINE app
Hey Shivkumar, great post I am very glad to have come across this and be able to follow the steps! Wondering which file to upload back to my host to make sure I don’t break anything? Kate, Wondrous
Kate recently posted…Kayaking – Rose Bay
Hi Kate,
Thanks for the complement!
If you have made changes in database and you are quite sure about the changes then you can directly go on your host server database and do same changes in respectively table otherwise you can export database from localhost to your host server.
And if you have made changes to file like .php, .css etc then you can replace that single file ( whichever file you have edited on localhost). Other wise you can upload all the files under www>STL(as per my example) on your host server.
Hope this would help you.
Thank for stopping by and I appreciate your query. Thank you.
Have a great day ahead! 🙂
>SK Lohar
Shivkumar recently posted…5 Google chrome tricks and shortcuts – PART I
Hi… is there any application fitted for Mac OS X? Xampp and wamp are both not supported for Mac…
Thanks a lot for the help.
Hi Dyan,
Xamp and wamp are for window supported server application. If still you are facing issue you can give a try to https://www.mamp.info/
Hope this will help.
Thanks for coming by and asking for help.
Have a great day ahead! 🙂
>SK Lohar
Shivkumar recently posted…Disable PC USB port and increase your system security in 2 minutes
Thanks it’s really very helpfull tutorial.
Hi Meenakshi,
Thanks for appreciating my work.
Please do subscribe my blog using subscription box provided at end of article, so that you won’t miss similar useful stuffs.
Have a great day ahead! 🙂
>SK Lohar
Shivkumar recently posted…Simple but useful keyboard shortcuts in window 7 –Part 2
Following your instructions I got to the install and then it threw these errors…
wp_posts: Table ‘spl.wp_posts’ doesn’t exist
wp_options: Table ‘spl.wp_options’ doesn’t exist
wp_postmeta: Table ‘spl.wp_postmeta’ doesn’t exist
How do I correct these so I can move on? I love your instructions, but need a little help.
Hi Tazcry,
If you have done each and every step and still facing the same issue then I would suggest you to download again latest version of wordpress and try again.
Hope it will help you. You may revert back in case of any issue.
Thanks for coming by asking for help.
Have a great day ahead! 🙂
>SK Lohar
Shivkumar recently posted…Disable PC USB port and increase your system security in 2 minutes
Ok, so now Ive edited my website offline on Xampp. How can I publish the changes to live website??
Hi Alnahhas,
Since now you have edited you site offline and ready to published. Here you have two options to go.
1. Note the modification you have done offline and make same changes by installing fresh theme online.
2. Uploaded changed file from you computer to your hosting server, don’t forget to import database.
Hope this will help.
Thanks for coming by.
Have a great day ahead! 🙂
>SK Lohar
Shivkumar recently posted…Reduce mobile data usage by disabling auto play FACEBOOK video
Is there a way to install a custom theme after following the above steps? When I go into the dashboard and try to install a new theme zip file I get a message that says “Are you sure you want to do this? And has a hyperlink that says “Please try again” Any suggestions?
Hi Ammon,
Please check whether you main folder of zip contain index.html file along with other files.
I think files which is uploaded by contain one folder within folder than you have index.html file.
Hope this help.
Thanks for coming by.
Have a great day ahead! 🙂
>SK Lohar
Shivkumar recently posted…Reduce mobile data usage by disabling auto play FACEBOOK video
Thank you for sharing wonderful information. I followed it and its working perfectly for me. 🙂
Hi Archana,
Glad to know that it worked perfectly for you.
Do subscribe my blog for other new useful stuff.
Thanks for coming by.
Have a great day ahead! 🙂
>SK Lohar
i have my offline install up and running but when I upload themes from WordPress the headers do not seem to be uploading as well as the photos from the Theme? Is working offline causing some functionality issues because I am really not online?
Hi David,
While uploading theme, there may be issue if you main folder is not containing index.php file or size of theme would be more than uploadable size from dashboard.
You can just unzip your theme folder in C:\wamp\www\stl\wp-content\themes\
now just reload your dashboard. Once dashboard is reloaded you can see same theme in installed theme option. Hope this would help.
Thanks for coming by.
Have a great day ahead! 🙂
>SK Lohar
Shivkumar recently posted…How to transfer files, media from phone to SD card and vice-versa?
I did everything correctly but it keeps saying error establishing a database connection please help.
Hi Emmanuel,
This error occur if you have not define correct database name and login detail. Please go through point no. 4 in above article.
Let me know if you still facing same issue.
Thanks for coming by and asking for help.
Have a great day ahead! 🙂
>SK Lohar
Shivkumar recently posted…Xnspy: Spy app to spy all private data for Android and iOS SmartPhone
Hello. many thanks for the help. I have followed all steps described but when I get to http://localhost/stl/wordpress/ I only see is the picture of a living room with 2 aloe vera on a table. On the left: My site Just another wordpress site, on the right a cursor facing downwards leading to a search panel. No administration panel or dashboard.
Any ideas?
Thank you
tried several times. I am using firefox and it stucks here
http://localhost/third/wordpress/wp-admin/install.php?step=2
Hi Notis,
What is an error you are getting while following steps?
You can send error screenshot at [email protected] or else try to write error in the comment box so that I can help you.
Thanks for coming by!
Have a great day ahead! 🙂
>SK Lohar
Shivkumar recently posted…Why You Should Consider Using an SMS Tracker App
I gave up.. i tried like 3 hours and can’t get through 4th point, it says error establishing connection, and when i change hostname from localhost to 127.0.0.1:8889, i got something like this:
Parse error: syntax error, unexpected ‘.0’ (T_DNUMBER) in C:\wamp64\www\testowa\wp-config.php on line 32
Call Stack
# Time Memory Function Location
1 0.0008 279856 {main}( ) …\index.php:0
2 0.0016 350976 require_once( ‘C:\wamp64\www\testowa\wp-admin\admin.php’ ) …\index.php:10
3 0.0021 371336 require_once( ‘C:\wamp64\www\testowa\wp-load.php’ ) …\admin.php:31
Could you help me with that please?
Hi Lukasz,
This setup is easy. But I think you have misconfigure the config file. Can you send me complete error at [email protected] and also send wp-config.php file.
I will be happy to help you.
Thanks for coming by.
Have a great day ahead! 🙂
>SK Lohar
Shivkumar recently posted…How to transfer files, media from phone to SD card and vice-versa?
Hi Shivkumar, your blog is really helpful and amazing.
I just have a few questions though; do you have to be online to install wordpress and do you have to have a pre-existing wordpress.org site to be able to set username and password
Hi Jude,
Sorry for replying late.
We don’t have to be online to install wordpress on localhost. You just need to download the setup file using the link provided in the article.
Hope this helps.
Thanks for coming by.
Have a great day ahead!
>SK Lohar
Shivkumar recently posted…How to successfully schedule study time with a printable calendar
thanks I appreciate. But how can I move the edited theme from localhost to the liveserver?
Hi Richard,
Once you are done with editing the theme locally you can access the same file at your local machine where wordpress is installed. You just need to upload the theme file in your server file manager at /wp-contents/theme/ folder using file zilla application.
After uploading file on server you would be able to use the edited theme in your live website. Hope this helps.
Shivkumar recently posted…Simple steps to opt out from Amazon Sidewalk